
Whenever you can, play by general principles. If there isn’t a serious reason why you’re ignoring this time-honored wisdom then adhere to it. To paraphrase the great Edward Lasker exceptions to chess rules occur far less frequently than most people admit. The principle I want to drive home is that you meet an attack on the flank by seizing the center.
Here is an online game where I play the Polish Opening, b4, and meet with a strong counterattack right down the middle. Black quickly equalizes and goes on to win.
1. Nf3 d5 2. b4 e6: White doesn’t want to play b4 right away because he would like black to tip his hand. Against king side fianchetto systems b4 is perfectly safe because the enemy bishop isn’t on its diagonal. White is forced to play b5 early on in this game and it wastes time. I’ve violated two principles here in both making a move that neglects the center and moving something twice.
I choose the Sokolsky because it’s inherent deficiencies happens to result in middle games I understand and enjoy. The fact remains that in playing this way white is not making the best use of his first move.
3. b5 c5: Black quickly grabs the central space which white didn’t take. White will his own say in the center by controlling e5 with the dark square bishop and the king knight. He aims to undermine the d5 pawn a la the Sicilian Defense with a timely c pawn advance. Unfortunately although he wants to play d3 the dark square bishop often wants to go there.
4. e3 Nf6 5. c4 Bd6 6. Bb2 O-O 7. Bd3: Now it’s time for a bit of math. The diagram below features the position after white’s seventh move. Who really controls the center? Obviously it’s being hotly contested but which player is pulling ahead, and looking forward to more mobile pieces? Well, break down the four squares one by one. White has two attackers on d4 and e5 while black has one defender on each. On d5 and e5 black has more control. The amount of central control is comparatively equal at 2 to 2.
This all gets tricky as a pawn on a central square weighs more heavily on the equation than piece pressure. So, depending on whom you ask they might say black is better. At any rate, black’s next move is a tiny mistake and I wonder if, based on what we’ve said, you can spot the reason why. Not because it drops material but 7…e5? doesn’t enhance central control. Black can develop his knight to d7 with an eye on bolstering his position.

8. Nxe5 d4 9. exd4: I exposed myself to a tactic, but my opponent didn’t catch it. Can you spot the way to exploit the loose bishop?
9…Re8 10. O-O Qc7 11. Nf3 Bg4: After black’s eleventh Fritz gives white a sizable advantage. Unfortunately I evaluated the board incorrectly, believing that I was obligated to play defense as the price for my material advantage. The plan beginning with an attack on the bishop is incorrect. Yes, exchanges favor white but he needs to play actively.
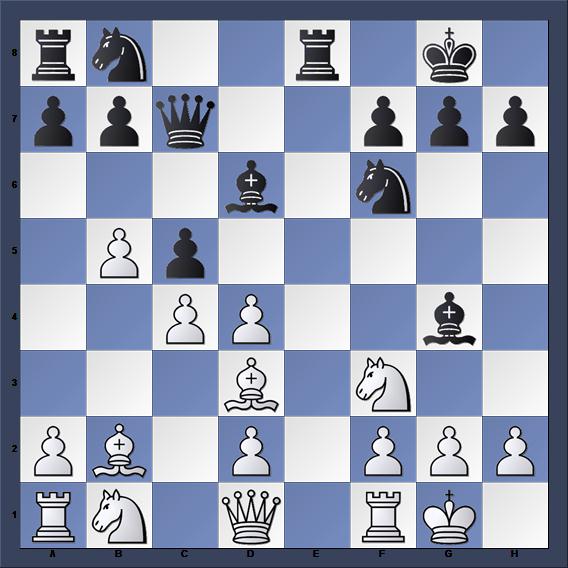
12. dxc5 Bxf3?? There’s a winning tactic for white that I didn’t see. There is a beautiful interrupting move the pawn can make on the queen.
13. Qxf3? Bxh2+ 14. Kh1 Be5: I was wrong in thinking that this was the main line but it is still very favorable for the first player.
After black executed the pin I started to drift, and consequently lost my central foothold. Black’s mobile pieces put him in a favorable tactical situation. It’s easier to protect your pieces when you can coordinate them. You do that best by having, you guessed it, those beautiful squares in the middle of the board.