I have been reading a book I highly recommend called The Tarrasch Formula. The authors are Sam Palatnik and Mark Ishee. The book contains one overarching motif, reducing the power of the the opponent’s pieces. By diminishing the power of a piece, even if you don’t win it, you create a a virtual material majority. While materially equal in actuality you are playing with an extra attacker and/or defender. If the situation is not rectified this factor is decisive. This idea has presented itself in one of my games from a recent online tournament. Not having known this at the time of the game I fell into a spectacular trap. Even with an extra piece I had few winning chances over the board.
NN vs. Giofreda, Online Game Mar 26, 2012
1. e4 e5 2. Nf3 Nc6 3. d4 exd4 4. c3 Nf6 5. cxd4 Nxe4: Black stands much better. It appears that black’s centralized king and exposed knight are going to lead to problems, but in fact his control of d2 saves him. After 5 Bd3…Bb4 black can keep the pawn without difficulty. Other continuations do not offer black significant trouble.
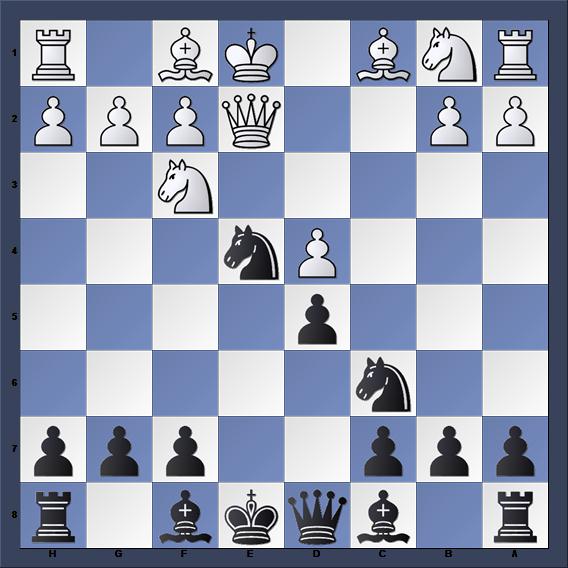
6 Qe2? d5:

After Black's Sixth Move
7. Ng5 Nxd4? 8.Qd3 Bb4+ 9. Nc3 Nxg5: This is the most accurate play to way. Black must realize he has a crushing advantage and play accordingly.
10. Qxd4 Bxc3+ 11. Qxc3 Qe7+ 12. Be2 O-O 13. O-O Qxe2 14. Bxg5 Qc4 15. Qg3 Qg4 16. Qe5 f6 17. Qxd5+ Be6 18. Qxb7 Qxg5 19. Rfe1?? Losing on account of the mate threat and the attack on the queen.
19…Qd5? 20.Qxc7 Rfc8 21. Qe7 Re8 22. Qa3 Bf7: I had no clear indication of how to proceed. The greater the space a player possesses the easier it is for him to avoid exchanges. If white occupies b3 with a pawn and places his rooks on the dark squares of the second rank his fortress is quite resilient. How is black to initiate favorable exchanges in this position? What is the destiny of the lone queenside pawn? Black is probably capable of holding off white’s counterplay long enough to trade it off and give white an isolated pawn. Is this enough? Tarrasch’s formula is in play here, for the inferior side.

After White's 22nd.
23. Red1 Qe4 24. Qd6! Rad8?! I had no pawn play in the position and I could not find a situation where my extra piece proved beneficial. I consent to the exchange of my two rooks for a queen. I failed in one regard; a chess player must not consider the pieces being exchanged but the pieces that remain on the board afterwards!
25. Qxd8 Rxd8 26.Rxd8+ Be8: White’s plan is to force black to loosen his kingside pawns to get play. A harassment-type defense, with the threat of perpetual check, is effective here. Black does not want to advance his kingside pawns too far because he has inadequate resources to win a pawnless ending.

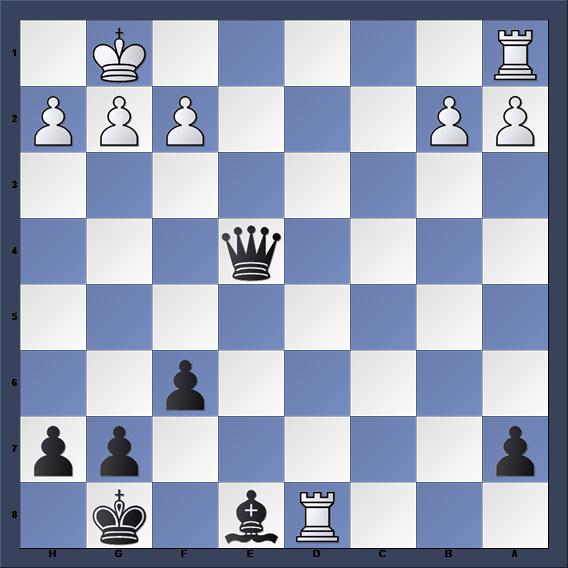
The Bishop is not Enough
27. f3 Qe3+ 28. Kh1 Kf7 29. Rad1 Bc6 30. R8d3 Qe5 31. Rc3 Ba4 32.Rdc1 Kg6 33. b3 Be8 34. Rc7 a6 35. Ra7 Bb5 36. a4 Bd3 37. Rac7 Qb2 38. h3 Bf5 39. R7c3 Qd2 40. Rc7 h5 41. Rf1 Kh6 42. Rc5 g6 43. Rc6 Qd3 44. Rf2 a5 45. g4 hxg4: White is defending well towards but denying black the opportunity to open the game is a better plan here.
46. hxg4 Bxg4! 47. fxg4 Kg5?? 48. Rc5+ Kxg4 49. Rg2+ Kf3 50. Rxa5?? Qf1+ 51.
Rg1 Qh3# 0-1