Uncategorized

Crazy Chess Theory: Part 1

What do you see when you look at a chessboard? Your answer may depend on your strength. Experts and masters refer to vectors. A queen has a definite magnitude and direction as she moves. Whether titled players are looking five moves ahead or twenty they are acutely conscious of all the lateral and diagonal movement possible for the queen as far as their vision extends.

When I began playing at a club nearly three years ago I answered this same question, posed to me by the woman teaching me the game, by tentatively reciting the names of the pieces. My materially focused answer wasn’t wrong, but rather incomplete.  She told me a chess board is actually a multi-dimensional field that encompasses space and time. Whoa!

After looking at her incredulously I took in what she was saying.  As the chessmen move forward they take up squares from the enemy pieces. If they keep making enemy pieces move away they can eat up additional ‘territory’. The idea of controlling space is a zero-sum concept. I take some land from the other side and add it to my the good guys’ acreage.

Against staunch defense it occurred to me though that the board’s material occupants were held down by rules much like those forces which govern our movements, keeping us bound to a rock in space. Sometimes you couldn’t take any space. It was frustrating to have this happen.

Ultimately we are trying to help the pieces triumph over the rules that govern them. This is not a small task. A rook is nominally better than a bishop but sometimes we have the worse piece. Make sure files get closed and pawns pry open the bishop’s desired diagonal.

As an exercise try to arrange your chessmen in such a fasion that they control the maximum amount of space possible. How many squares can you take? You see there is a limit to the positive space you can enjoy on the chessboard.

You will find many positions where no spatial advantage exists and one cannot easily be manufactured. Have you ever been in such a situation? Because of the inherent limitations of your army every square you seize may cause you to lose another somewhere else!

Today as I’ve progressed a little further in my development I see that my teacher missed out on an important concept, negative space. The objective of gaining space can be met not by actively controlling everything, but by protecting the territory which leads to those squares you want to possess. In an endgame these are called corresponding squares but I believe that restricting this particular idea to the last few moves of a chess game is to do ourselves an injustice. It’s something to think about!
World Chess Championship 2012

The 2012 World Chess Championship will pit the defending champion Viswanathan Anand against challenger Boris Gelfand of Israel. Anand is considered a heavy favorite in May’s Match as he is well on his way to numbering among the all-time greats. The game below is one of all my favorites from the champion. Next time we’ll look at Gelfand’s artistry in the Petroff to see why it is so difficult to win against him with e4.

(1999) Viswanathan Anand – Peter Svidler

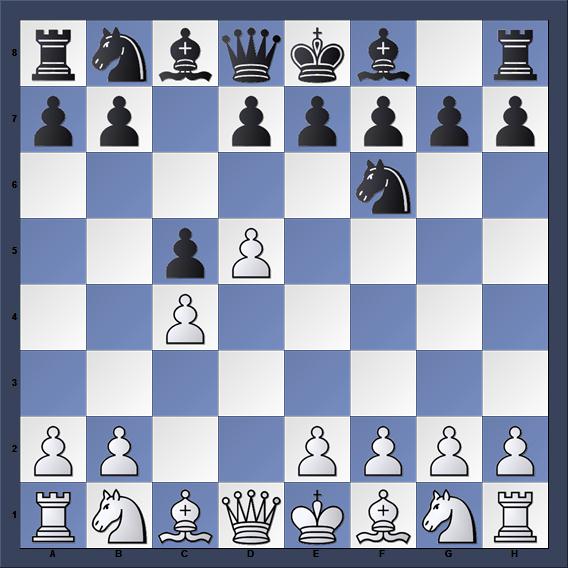
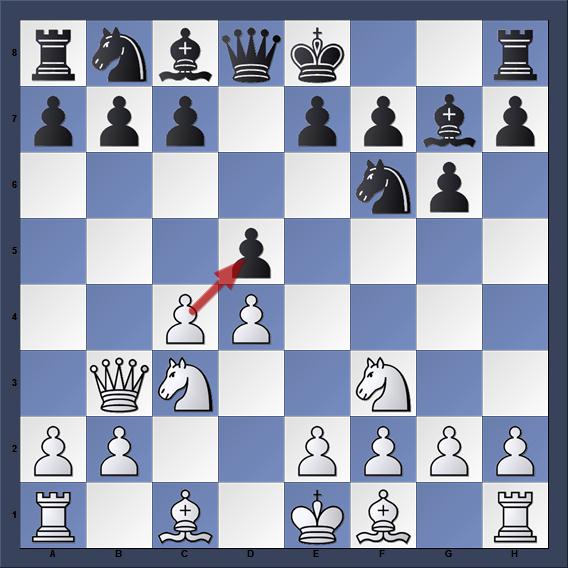
1. d4 Nf6 2. c4 g6 3. Nc3 d5 4. Nf3 Bg7 5. Qb3: This is the Russian System in the Grunfeld Defense. It’s a port in the storm for those of who prefer a solid, stable system.  The riskier exchange variation (5.dxe Nxd5 6 e4 Nxc3 7 bxc3) followed soon after by black’s c5 thrust makes for a more complex struggle. White gains a lead in development and forces black to abandon a central pawn. Black will eventually get a chance to kick white’s queen around as compensation. After 5…c6 6 cxd white would, depending on the method of black’s recapture, either get an improved Slav Exchange with black’s bishop misplaced, or an Exchange Grunfeld with c5 essentially taking two moves.

The Russian System

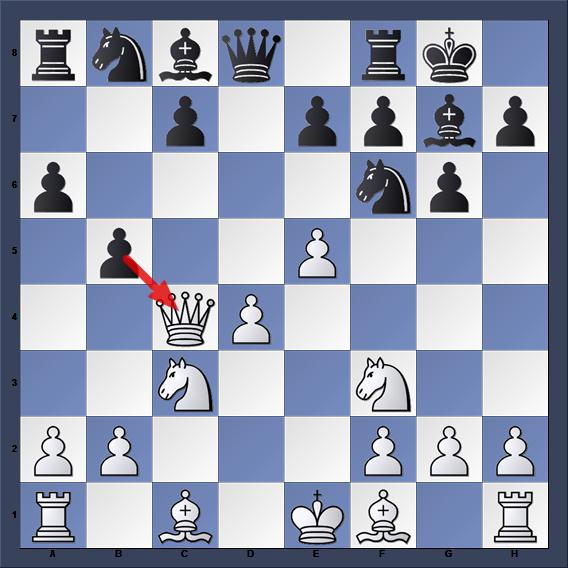
5…dxc4 6. Qxc4 O-O 7. e4 a6 8. e5 b5: Black can either come after the queen with pawns or pieces.

After 8...b5

9. Qb3 Nfd7 10. h4 c5 11. e6 c4 12. Qd1 Nb6 13. exf7+ Rxf7 14. h5 Nc6 15. hxg6 hxg6 16. Be3 Bf5 17. Ng5 Rf6 18. g4 Be6: Black has been expanding on the queen side and white is attacking on the opposite wing. The first player has secured used of the h-file while black’s pieces are slightly better.

After 18. Be6

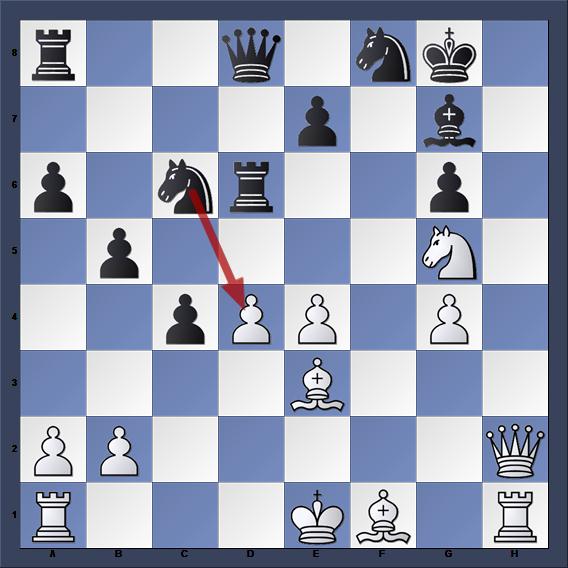
19. Nce4 Bd5 20. Qd2 Rd6 21. f3 Bxe4 22. fxe4 Nd7 23. Qh2 Nf8: This is the wrong plan. Black’s position is beyond the help of simple defensive moves. He must counterattack or lose.

After 23...Nf8

24. e5 Rd7 25. Ne6 Qa5+ 26. Bd2 Nxe5 27. Be2 c3 28. Bxc3 b4 29. Nxg7 bxc3?? 30. Qh8!+ Kf7

31. O-O+ 1-0: What a flourish! The game ends by castling. Perhaps Svidler, sensing he was lost, played bxc3 allowing his opponent this interesting and rare mating opportunity.

The Tarrasch Formula in Practice

I have been reading a book I highly recommend called The Tarrasch Formula. The authors are Sam Palatnik and Mark Ishee. The book contains one overarching motif, reducing the power of the the opponent’s pieces. By diminishing the power of a piece, even if you don’t win it, you create a a virtual material majority. While materially equal in actuality you are playing with an extra attacker and/or defender. If the situation is not rectified this factor is decisive. This idea has presented itself in one of my games from a recent online tournament. Not having known this at the time of the game I fell into a spectacular trap. Even with an extra piece I had few winning chances over the board.

NN vs. Giofreda, Online Game Mar 26, 2012
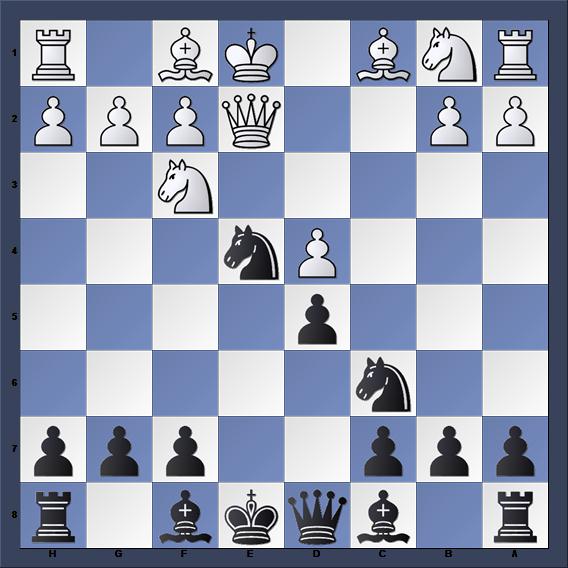
1. e4 e5 2. Nf3 Nc6 3. d4 exd4 4. c3 Nf6 5. cxd4 Nxe4: Black stands much better. It appears that black’s centralized king and exposed knight are going to lead to problems, but in fact his control of d2 saves him. After 5 Bd3…Bb4 black can keep the pawn without difficulty. Other continuations do not offer black significant trouble.
6 Qe2? d5:
After Black's Sixth Move
7. Ng5 Nxd4? 8.Qd3 Bb4+ 9. Nc3 Nxg5: This is the most accurate play to way. Black must realize he has a crushing advantage and play accordingly.
10. Qxd4 Bxc3+ 11. Qxc3 Qe7+ 12. Be2 O-O 13. O-O Qxe2 14. Bxg5 Qc4 15. Qg3 Qg4 16. Qe5 f6 17. Qxd5+ Be6 18. Qxb7 Qxg5 19. Rfe1?? Losing on account of the mate threat and the attack on the queen.
19…Qd5? 20.Qxc7 Rfc8 21. Qe7 Re8 22. Qa3 Bf7: I had no clear indication of how to proceed. The greater the space a player possesses the easier it is for him to avoid exchanges.  If white occupies b3 with a pawn and places his rooks on the dark squares of the second rank his fortress is quite resilient. How is black to initiate favorable exchanges in this position? What is the destiny of the lone queenside pawn? Black is probably capable of holding off white’s counterplay long enough to trade it off and give white an isolated pawn. Is this enough? Tarrasch’s formula is in play here, for the inferior side.
After White's 22nd.
23. Red1 Qe4 24. Qd6! Rad8?! I had no pawn play in the position and I could not find a situation where my extra piece proved beneficial. I consent to the exchange of my two rooks for a queen. I failed in one regard; a chess player must not consider the pieces being exchanged but the pieces that remain on the board afterwards!
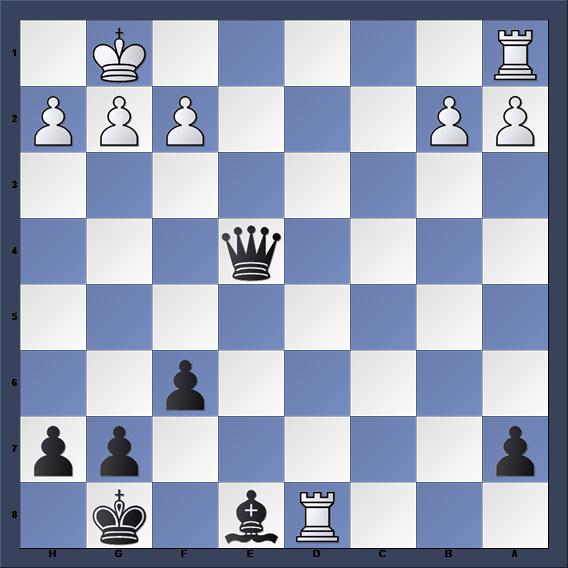
25. Qxd8 Rxd8 26.Rxd8+ Be8: White’s plan is to force black to loosen his kingside pawns to get play. A harassment-type defense, with the threat of perpetual check, is effective here. Black does not want to advance his kingside pawns too far because he has inadequate resources to win a pawnless ending.
The Bishop is not Enough
27. f3 Qe3+ 28. Kh1 Kf7 29. Rad1 Bc6 30. R8d3 Qe5 31. Rc3 Ba4 32.Rdc1 Kg6 33. b3 Be8 34. Rc7 a6 35. Ra7 Bb5 36. a4 Bd3 37. Rac7 Qb2 38. h3 Bf5 39. R7c3 Qd2 40. Rc7 h5 41. Rf1 Kh6 42. Rc5 g6 43. Rc6 Qd3 44. Rf2 a5 45. g4 hxg4: White is defending well towards but denying black the opportunity to open the game is a better plan here.
46. hxg4 Bxg4! 47. fxg4 Kg5?? 48. Rc5+ Kxg4 49. Rg2+ Kf3 50. Rxa5?? Qf1+ 51.
Rg1 Qh3# 0-1

How to Handle Flank Openings

Whenever you can, play by general principles. If there isn’t a serious reason why you’re ignoring this time-honored wisdom then adhere to it. To paraphrase the great Edward Lasker exceptions to chess rules occur far less frequently than most people admit. The principle I want to drive home is that you meet an attack on the flank by seizing the center.

Here is an online game where I play the Polish Opening, b4, and meet with a strong counterattack right down the middle. Black quickly equalizes and goes on to win.

1. Nf3 d5 2. b4 e6: White doesn’t want to play b4 right away because he would like black to tip his hand. Against king side fianchetto systems b4 is perfectly safe because the enemy bishop isn’t on its diagonal. White is forced to play b5 early on in this game and it wastes time. I’ve violated two principles here in both making a move that neglects the center and moving something twice.

I choose the Sokolsky because it’s inherent deficiencies happens to result in middle games I understand and enjoy. The fact remains that in playing this way white is not making the best use of his first move.

3. b5 c5: Black quickly grabs the central space which white didn’t take. White will his own say in the center by controlling e5 with the dark square bishop and the king knight. He aims to undermine the d5 pawn a la the Sicilian Defense with a timely c pawn advance. Unfortunately although he wants to play d3 the dark square bishop often wants to go there.

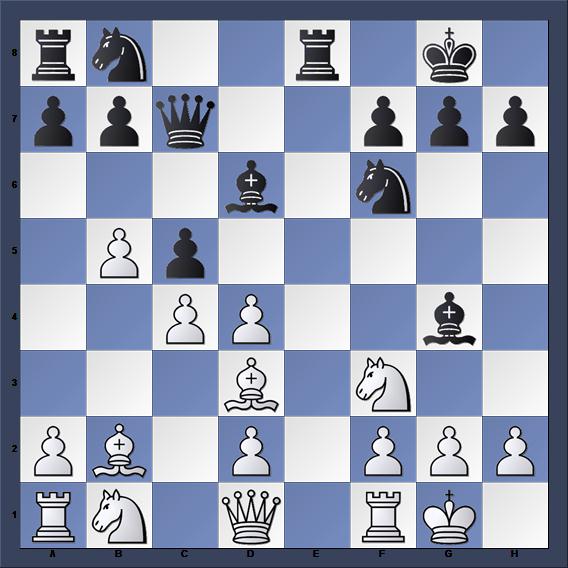
4. e3 Nf6 5. c4 Bd6 6. Bb2 O-O 7. Bd3: Now it’s time for a bit of math. The diagram below features the position after white’s seventh move. Who really controls the center? Obviously it’s being hotly contested but which player is pulling ahead, and looking forward to more mobile pieces? Well, break down the four squares one by one. White has two attackers on d4 and e5 while black has one defender on each. On d5 and e5 black has more control. The amount of central control is comparatively equal at 2 to 2.

This all gets tricky as a pawn on a central square weighs more heavily on the equation than piece pressure. So, depending on whom you ask they might say black is better. At any rate, black’s next move is a tiny mistake and I wonder if, based on what we’ve said, you can spot the reason why. Not because it drops material but 7…e5? doesn’t enhance central control. Black can develop his knight to d7 with an eye on bolstering his position.

8. Nxe5 d4 9. exd4: I exposed myself to a tactic, but my opponent didn’t catch it. Can you spot the way to exploit the loose bishop?

9…Re8 10. O-O Qc7 11. Nf3 Bg4: After black’s eleventh Fritz gives white a sizable advantage. Unfortunately I evaluated the board incorrectly, believing that I was obligated to play defense as the price for my material advantage. The plan beginning with an attack on the bishop is incorrect. Yes, exchanges favor white but he needs to play actively.

12. dxc5 Bxf3?? There’s a winning tactic for white that I didn’t see. There is a beautiful interrupting move the pawn can make on the queen.

13. Qxf3? Bxh2+ 14. Kh1 Be5: I was wrong in thinking that this was the main line but it is still very favorable for the first player.

15. Nc3 Nbd7: It’s okay for white to have temporarily pinned his piece in the name of development but it can’t stay that way!
16. Rab1 Nxc5 17. Bf5 b6 18. Rfe1 Rad8 19. Nd5 Nxd5
20. cxd5?? Bxb2: Up until this point black was materially worse but had full compensation due to piece activity and central control. Unfortunately white failed to find Bxe5 or d4 in this position and loses material. The backrank mate is a significant threat that prevents the recapture of black’s bishop. The game is effectively over.
21. Rxe8+ Rxe8 22. Qh3 g6 23. Bc2 Bd4 24. Rf1 Ne4 25. Bxe4 Rxe4 26. g3 Qe7 27.
Qc8+ Kg7 28. f4 Re1 29. Rxe1 Qxe1+ 30. Kh2 Qg1+ 31. Kh3 h5 32. g4 Bf2 33. Qc3+
Kh7 34. gxh5 Qf1+ 35. Kg4 Qg2+ 0-1

After black executed the pin I started to drift, and consequently lost my central foothold. Black’s mobile pieces put him in a favorable tactical situation. It’s easier to protect your pieces when you can coordinate them. You do that best by having, you guessed it, those beautiful squares in the middle of the board.

Greatest Moves Ever: Part II

Thanks again to Tim Krabbe and his excellent list of chess brilliancies. The move in question is the the last chance to convert the win, and it cements Bronstein’s legacy as an uncompromising, stylistic genius.

Brzozka – Bronstein, 1963

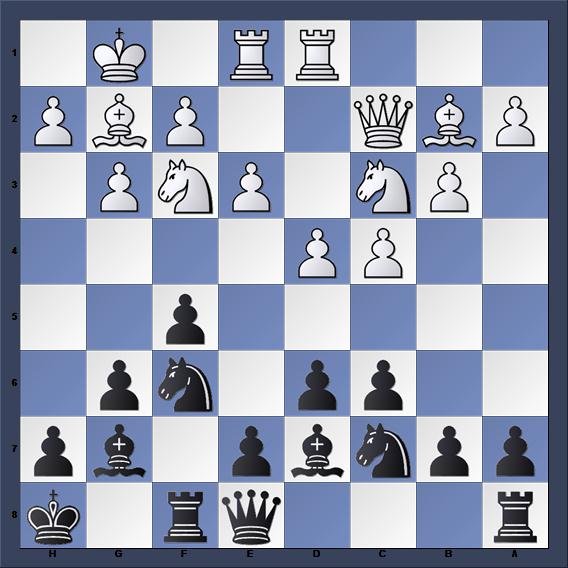
1.c4 f5 2.Nf3 Nf6 3.g3 g6 4.Bg2 Bg7 5.O-O O-O 6.d4 d6 7.Nc3 c6 8.Qc2 Kh8 9.b3 Na6 10.Bb2 Nc7 11.Rad1 Bd7 12.e3 Qe8 13.Rfe1

In a sense this delayed Dutch is already a brilliant game. Black controls the center with a seemingly fragile mix of pawns and pieces. He’s about to play the odd Rd8 to provide more protection to d5. Despite the cramped nature of black’s game white has a difficult time making his space advantage count. Bronstein is careful to avoid passivity at all times.

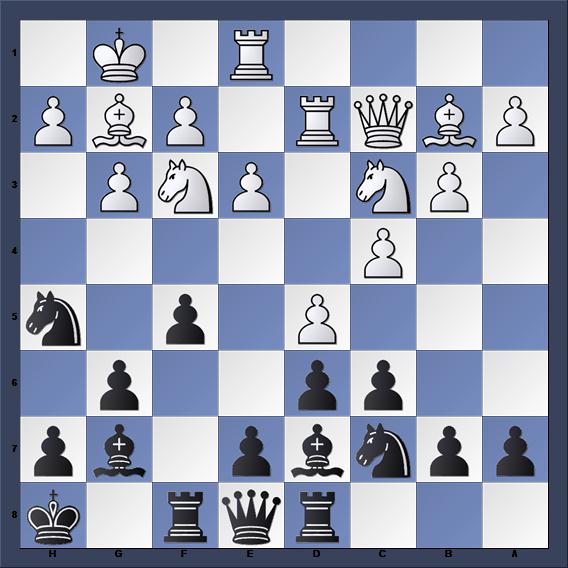
13…Rd8 14.Rd2 Nh5 15.d5

Black plays 15…Qf7! If you look closely you can see that black, through accurate piece placement, actually has better control of d5. The knight doesn’t count as a defender because it can be eliminated. Black will have to respond to the check afterwards but he should be able to hold onto d5. White must cede control of this important square. Watch how his position slowly erodes from this point forward.

16.dxc6 bxc6 17.Ne2 c5 18.Nf4 Nf6 19.Ng5 Qg8 20.Bc3 Rde8 21.Ba5 Ne6 22.Ngxe6 Bxe6 23.Nxe6 Qxe6 24.Qd3 Ne4 25.Qd5 Qxd5 26.Rxd5 Bc3 27.Bxc3+ Nxc3 28.Rd2 Ne4 29.Rb2 a5 30.f3 Nf6 31.Kf2 Rb8 32.Ke2 Rb6 33.Kd3 e5 34.f4 e4+ 35.Kc3 Kg7 36.Bf1 h5 37.h4 Rfb8 38.Be2 a4 39.Reb1 a3 40.Rd2 Kf7 41.Rbd1 Ke7

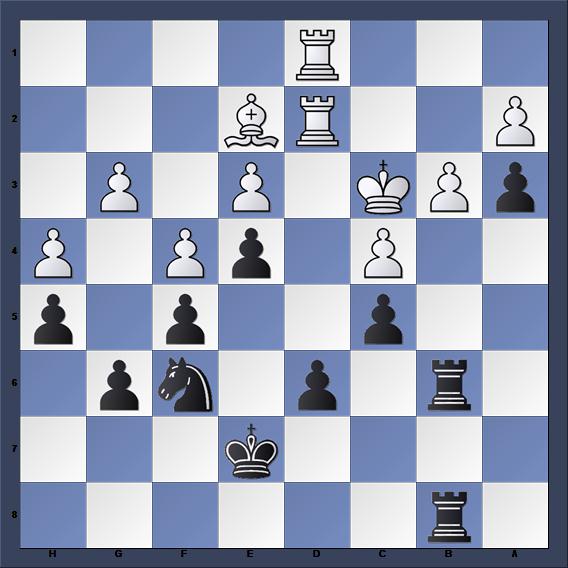
42.Rd5!? White is struggling. He has the worst minor piece and his rooks can’t find good spots. He realizes that his heavy pieces are terrible and that black’s knight is easily better than either of them. He tries the exchange sacrifice banking that black, with no pawn levers, will eventually have to sacrifice the exchange back to have winning chances. This shows great strategic awareness. Black doesn’t bite of course, but it was worth a try.

…Ne8 43.R1d2 Nc7 44.Bd1 Na6 45.Bc2 Nb4 46.Bb1 Ra6 47.Rd1 Nxd5+ 48.Rxd5

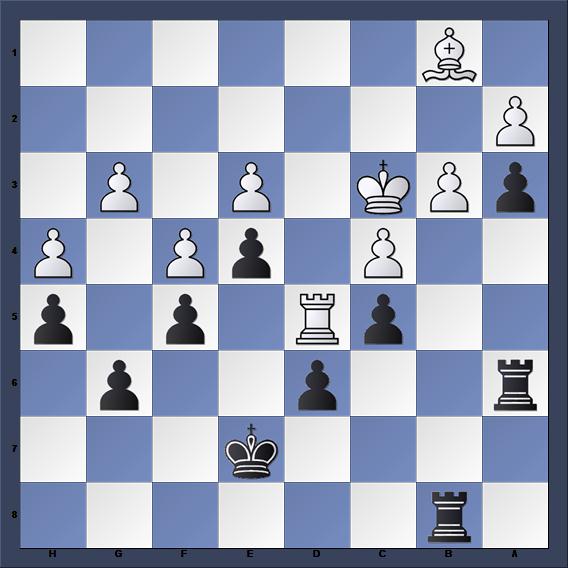
Well, it looks like after 48. Rxd5 the game is a clear draw. Not in Bronstein’s book. Can you spot the killer variation and the idea behind it? After 48..Rxb3!! and the ensuing rook penetration black’s pawns give more than adequate compensation for the piece. Although white puts up a stout defense the triple connected passers roll right on down the board.

49.Kxb3 Rb6+ 50.Kc2 Rb2+ 51.Kc1 Re2 52.Rd1 Rxe3 53.Rg1 Rc3+ 54.Kd2 Rxc4 55.Bc2 d5 56.Rb1 d4 57.Bd1 Rc3 58.Rb3 e3+ 59.Ke2 Rc1 60.Rxa3 c4 61.Ra7+ Kd6 62.Ba4 Rh1 63.Rd7+ Kc5 64.Rc7+ Kb4 65.a3+ Kc3 66.Bb5 Rh2+ 67.Kf1 d3 68.Rxc4+ Kb2 69.Kg1 e2 70.Kxh2 e1Q and White resigned

Sending Out the Signal Flare: Part One

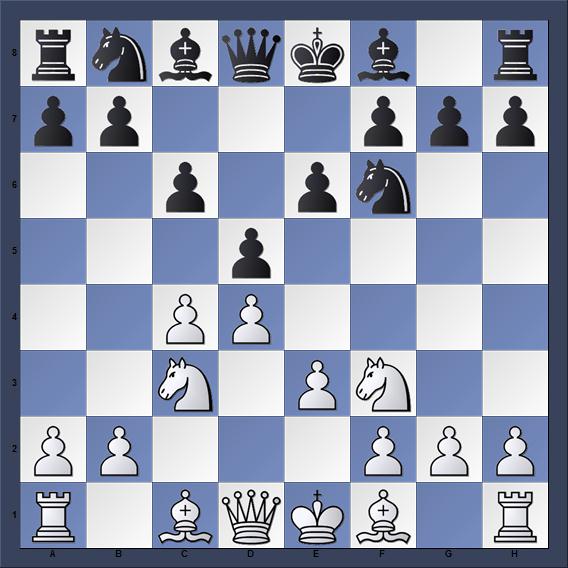
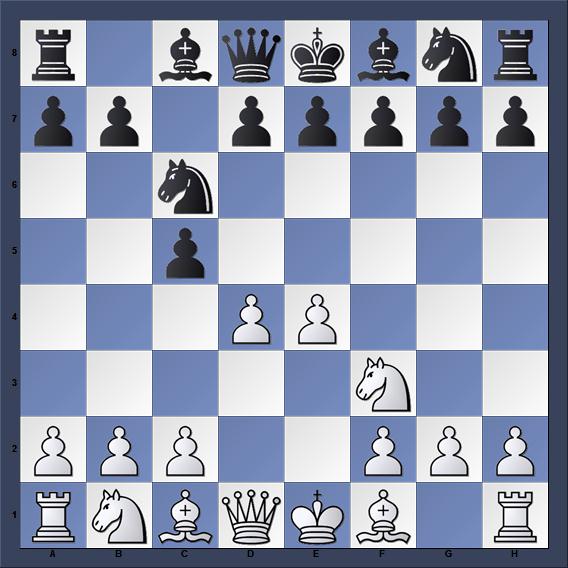
I found a line yesterday that needed to be explored. I’d love to share the results with you of my research into this creative and interesting answer to the Semi-Slav Defense.  Here is the basic position. The solid pawn structure of black is tough to crack. White generally tries either 5 Bg5 if he has years to study all of the complications. He can also use the quieter Meran systems stemming from 5 e3 which lead to a bunch of theory as well. Where is the chess player in all of this? You know, the guy or girl who wants to get down to business.

Well, I have your solution but I should offer one note of caution. It’s possible for black to unwittingly sidestep your plan in one of three ways. He can take on c4 immediately. That’s okay because you’re virtually assured a good game if this happens. To capture immediately allows your bishop to get to c4 in one move instead of two (normally it makes a pit stop on d3). This tempo is all your need to have a good chess game with natural moves.

Another idea is to play 5…a6 and declare his or her intention to launch into the Noteboom variation. Black will try to create a rolling pawn mass to smother white’s pieces while gambling that he can ignore his development behind his light-squared fortress. In my experience this plan is rare but we will deal with it in a future post for certain. I recommend playing c5 after a6.

The third idea is if they play the bishop to a slightly inferior square e7. You’ll see that it takes nothing more than a simple move order trick to solve this one. Enough suspense, let’s see the idea:

1 d4 d5 2 Nf3 Nf6 3 c4 c6 4 Nc3 e6 5 e3 Bd6 6 Qc2 Nbd7 7 g4!

White’s plan is to displace the knight if he is allowed to get in g5 and if the gambit pawn is taken he will have a dangerous open file. Black has many plans and it makes for an interesting struggle with good chances for both sides. Plans are roughly divided into a) parrying the threat b) supporting the knight c) creating counterplay against the loose knight on f3 d) ignoring it and focusing on a plan that begins with dxc4. You can also see that the bishop on e7 offers another potential attacker on the g pawn. I like the finesse Rg1 ahead of the push. Yes, you telegraph it but you should welcome a weakening move like h5. It will give you something to play against. That’s what breaking the Semi-Slav is all about!

A Beautiful Mind

If there’s anyone that makes me appreciate the beauty of chess it’s Jose Raul Capablanca. His style of chess made his games the most accessible of any of the greats. His formula was incredibly simple. Get to a position where you are the only player who knows how to win! His games offer the amateur the clearest path to achievement, calculating well and improving one’s technical prowess. Here’s a game I admire very much. It’s from Capablanca – Rubenstein, Berlin, 1928. Here is the critical position. How would you proceed as white?

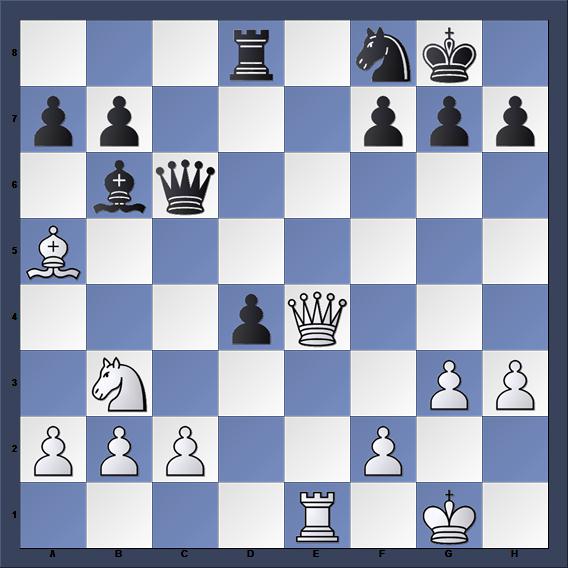
Now, for sure there is more than one way to go here. You might move the queen to avoid an exchange since white’s queen seems better than its counterpart. You might shuffle the pieces around hoping for an error caused by black having to defend the d pawn. Capablanca went for the throat with the simple 22 Qxc6! Can you calculate the position after the forced sequence? Capablanca could and with his strategic vision he knew that the endgame would be pleasant.

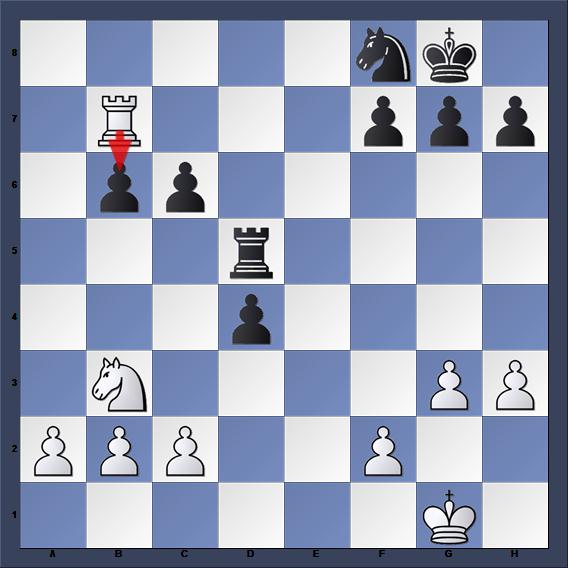
This is the position after 25. Rb7. Both of white’s pieces are extremely well-placed relative to black’s. Capablanca saw the defining feature of the position and headed directly to it. He knew that his winning possibilities actually increased after simplifying the game.

Black obliges white by abandoning the pawn. Of course he had to give it up sooner or later. White is careful not to allow his pieces to become too displaced after grabbing the pawn. Black only regains material equality temporarily. Like a Sherlock Holmes over the chessboard Capablanca was armed with the best weapon anyone could ask for, killer intuition. Hone yours by looking for positions where you can dictate the flow of the game. Why allow wild counterplay if you have other options? The full text of the game is below.

1. d4 d5 2. Nf3 c5 3. dxc5 e6 4. e4 Bxc5 5. exd5 exd5 6. Bb5+ Nc6 7. O-O Nge7

8. Nbd2 O-O 9. Nb3 Bb6 10. Re1 Bg4 11. Bd3 Ng6 12. h3 Bxf3 13. Qxf3 Nce5 14.
Qf5 Nxd3 15. Qxd3 d4 16. Bd2 Qf6 17. Re4 Rad8 18. Rae1 Qc6 19. g3 Rfe8 20. Ba5
Rxe4 21. Qxe4 Nf8 22. Qxc6 bxc6 23. Re7 Rd5 24. Bxb6 axb6 25. Rb7 Nd7 26. Rc7
Rd6 27. Rc8+ Nf8 28. Nd2 c5 29. Nc4 Re6 30. Rb8 Re1+ 31. Kg2 g5 32. a4 Ra1 33.
Nxb6 Kg7 34. Rc8 Ne6 35. Nd7 Rxa4 36. Nxc5 Rb4 37. Nd3 Rb5 38. Kf3 h6 39. b4 h5
40. g4 hxg4+ 41. hxg4 f6 42. Rc4 Kf7 43. Nc5 Nd8 44. Nb3 *

The Enigmatic C Pawns: Part 1

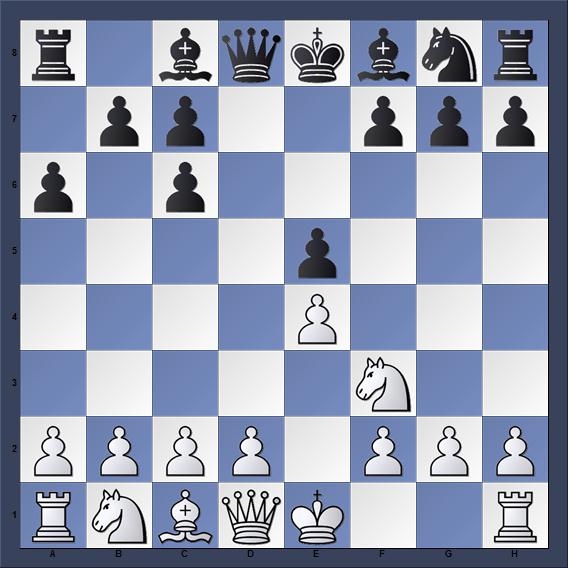
What spectacular little chessmen! On their very first move they often have an outsized impact on the game. Does white dare exchange his d4 pawn for black’s and release his central control?   Not likely, lest he let black’s king bishop develop with tempo. The C pawn is a confusing character. It’s way too good to dismiss in importance but hard to take off the board without concessions. In the Sicilian white waits for his d pawn to be taken so at least he can get some good piece play for ceding a central majority. In the Benoni white simply says ‘no thanks’ and walks his D pawn right on past. This defines the middlegame of that defense right away as well. Black will be forced to break on b5 or f5 or risk suffocation.

You’ve heard me talk before about the power of the pawn majority in unbalanced pawn structures; the side with the extra pawn in one sector can often create a passed pawn in the endgame. Well, in the Ruy Lopez Exchange that’s white’s entire gameplan! Blunt the mighty c pawn by exchanging bishop for knight on c6 and quickly, before black mobilizes his c pawn, engineer a trade of the d pawn for black’s e pawn. Suddenly the plans are in motion cheapest cialis online uk. White’s kingside majority is capable of barging through on its own while black’s cannot. It sounds like a lot but really white’s strategy couldn’t happen without making the c pawns irrelevant first. By doing that has to give black active pieces and attacking chances. There’s a lot of attention paid to a piece that can’t even move backwards!

Black isn’t the only one that strike fast and hard with his own c pawn. Often a great idea in openings like the Guico Piano is using c3 as a way to bolster d4. Generally it’s good for white when the c pawn captures towards the center, forming a duo with the pawn on e4. White is actually willing to develop his knight to a completely different location in order to bring this about.

The C pawn works together with the D pawn to move the bishop

How about that amazing dark square bishop in the King’s Indian? Black pends the whole game improving through the clearing of its diagonal? Well, a white pawn on c3 backs up the all important d4 and keeps that powerful piece at bay for a time. In fact the exchange of the respective c pawns for one another in their second incarnation as d pawns is usually the prelude for all out war on the c file. I hope you have your rooks ready!

Something's Gotta Give
White Avoids Pawn Tension

Venturing out to a Chess Club

You may be chess royalty when it comes to playing against your friends but how about facing down a grizzled stranger hungry for battle? That’s right I’m talking about people that will meet your every threat with brow-furrowing calculation to see if they should even bother defending. At my local club one man once played a famous American grandmaster to a draw. He’ll show you the game score if you want to see it, or chances are even if you don’t. That’s not a guy you want to tangle with if you’re unsure of your strength. So here’s a list of things you want to do before trying to take your game to the next level:

Know the opening that you want to play: To have success look at lines that the great players have played. Your opening has to do something positive, control the center with either pieces or pawns. You don’t need to know every line twenty moves deep but get a feel for the positions that emerge out of the opening. You’ll eventally have to decide what to do over the board and it can be tricky if you’re unprepared. I suggest learning a system where move order doesn’t matter like The Colle System. It’s a club favorite all over the world because it gives you a good game where you can start playing without much preparation. For black you’ll need to know one defense to e4 an d4. Other openings are rare enough so you don’t have to worry about them just yet.

When in doubt don’t reinvent the wheel: If something feels wrong it probably is. Even after playing a few games you develop instincts about what works and what doesn’t. If your opponent has all his pieces developed and you’re trying to conduct an attack with only two it’s bound to be refuted right? If you weaken the pawns around your king early that will lead to difficulties later. Sometimes all it takes to end up on top is a bit of patience.

Be humble: Don’t expect to win all of your games. Chess is a game of pure skill without any of the forgiveness of games in which luck is a factor. A better player will stomp you over and over until you want to fold up your board and hit the road. However, when you do crack their vaunted defense or stop one of their attacks cold not only do you win a chess game but you get vindication as well! If you lose don’t forget to ask one of them to help you with your post-mortem analysis. Chess players are lifelong learners and many of them get as much of a thrill out of sharing information they do out of absorbing it.

Two Knights Checkmate: Is it possible?

Today I bring to you a fun little puzzle. Now if you’ve ever tried to checkmate with two knights against a lone king you know it can’t be forced. Unless the enemy king is feeling a little reckless and drives itself into the corner it is safely a draw despite your being six points of material up. The option to stalemate provides an easy defense for the inferior side.

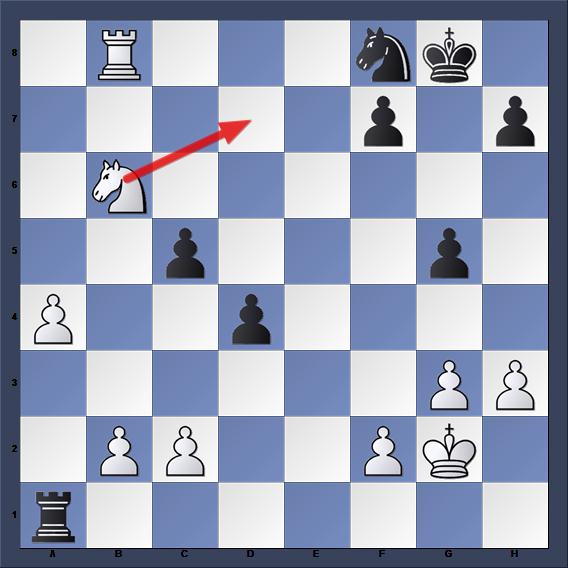
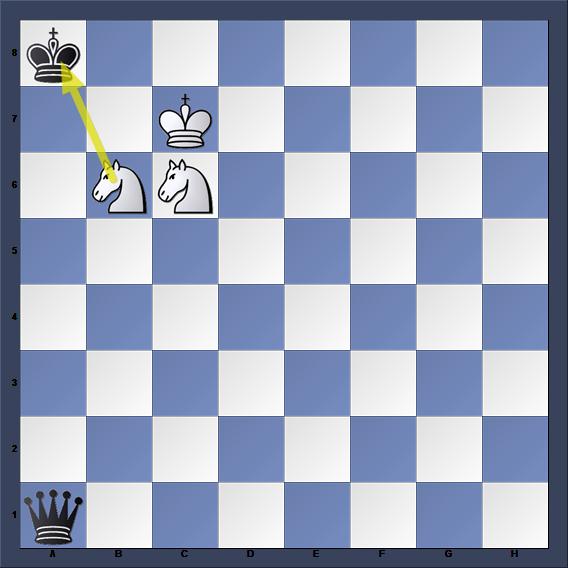
In the situation below white has a win. Be wary when solving that’s it not as easy as it looks. If the black king is allowed to escape to b7 it’ll be difficult to round back up. Proper play is to stalemate the enemy king on the edge of the board while blockading his pawn. Don’t capture it whatever you do. The tempi that it uses as it rushes headlong to the queening square can be used to maneuver your knights into position. There is no stalemate as long as the pawn has moves left. In this particular puzzle I’ve graciously provided you absolutely no extra moves to work with. Good luck! See one possible solution below.

White to play and win?

1. Nc5 a5 2. Kd5 a4 3. Kd6 a3 4. Kc7 a2 5. Nd7 a1=Q  6. Nb6# 1-0

The situation is a win because the pawn is behind the Troitsky Line. The ‘line’ is a set of discrete points a4, b6, c5, d4, e4, f5, g6, and h4 (reverse it if you’re black). These endgames are very rare but beautiful; they take a remarkable amount of precision and are one of the most difficult to win. In many cases they cannot be won under tournament conditions since the game is drawn after 50 moves and they can take more than double this amount. Remember the technique of stalemating the king, where having to move leads to deterioration of the position. This theme, known as zugzwang, will come up again and again in endgames.

Checkmate
Scroll to Top